
Parts List
- Webcam of your choice (I used a Logitech C510 HD Webcam) — keep in mind that you’re going to want to mount it to the pan/tilt bracket somehow
- Arduino Uno
- Pan/Tilt Bracket from SparkFun
- 2x Small Servos
- PC Board or breadboard (I like these from RadioShack)
- Red LED
- 330 ohm resistor
- Male break-away pin headers
- Wire
- Wood, metal, or plastic for your base
- Screws, nuts, and washers for mounting everything
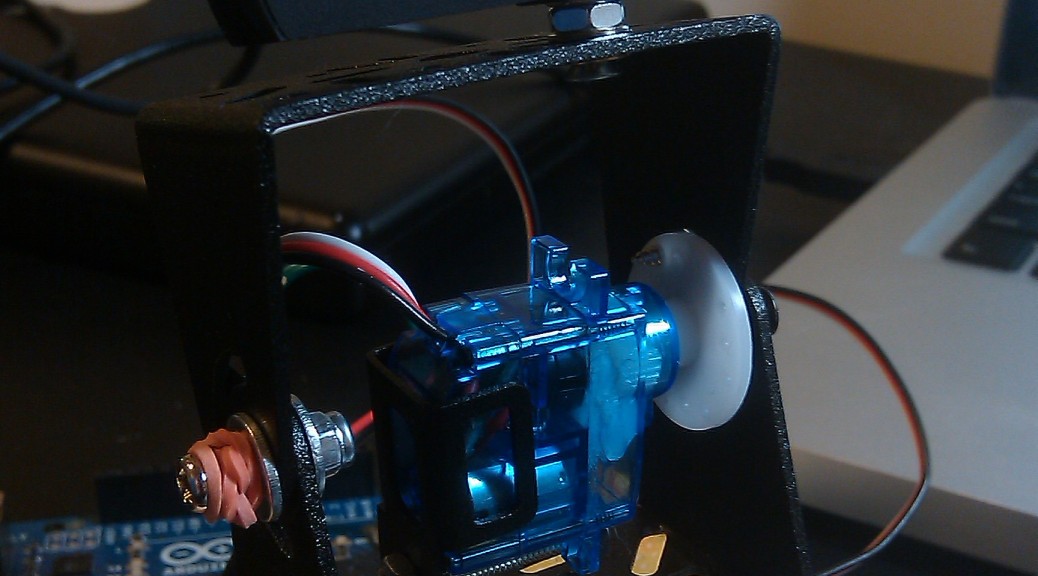
Assembling the pan/tilt unit

Arduino connections

Arduino Code
![]() Code available at Github here: https://github.com/jessicaaustin/robotics-projects/tree/master/pan-tilt-unit
Code available at Github here: https://github.com/jessicaaustin/robotics-projects/tree/master/pan-tilt-unit
Once you’ve uploaded the following code to your Arduino, you should be able to control the pan/tilt unit via the Serial Monitor.
#include <Servo.h>

Servo pan_servo;
Servo tilt_servo;
int incomingByte;

void setup()
{
 // attach the servos and startup the serial connection
 pan_servo.attach(9);
 tilt_servo.attach(8);
 Serial.begin(9600);
 resetAll();
}

void loop()
{

 // check to see if something was sent via the serial connection
 if (Serial.available() > 0) {
 incomingByte = Serial.read();

 // move the servos based on the byte sent
 if (incomingByte == 'e') {
 moveServo(tilt_servo, 1);
 } else if (incomingByte == 'x') {
 moveServo(tilt_servo, -1);
 } else if (incomingByte == 'd') {
 moveServo(pan_servo, 1);
 } else if (incomingByte == 's') {
 moveServo(pan_servo, -1);
 } else if (incomingByte == 'r') {
 resetAll();
 } else if (incomingByte == '/') {
 Serial.println("pan: " + pan_servo.read());
 Serial.println("tilt: " + tilt_servo.read());
 }
 }

}

// move the servo a given amount
void moveServo(Servo servo, int delta) {
 int previousValue = servo.read();
 int newValue = previousValue + delta;
 if (newValue > 180 || newValue < 30) {
 return;
 }
 servo.write(newValue);
}

// put the servos back to the "default" position
void resetAll() {
 reset(pan_servo);
 reset(tilt_servo);
}

// put a servo back to the "default" position (100 deg)
void reset(Servo servo) {

 int newPos = 130;
 int previousPos = servo.read();
 if (newPos > previousPos) {
 for (int i=previousPos; i<newPos; i++) {
 servo.write(i);
 delay(15);
 }
 } else {
 for (int i=previousPos; i>newPos; i--) {
 servo.write(i);
 delay(15);
 }
 }

}
Controlling the Arduino via a script
I used todbot‘s arduno-serial.c program to control the Arduino via the command line.
Get arduino-serial.c and test it out:
wget http://todbot.com/arduino/host/arduino-serial/arduino-serial.c

gcc -o arduino-serial arduino-serial.c

# test moving the camera up and to the right

./arduino-serial -b 9600 -p /dev/tty.usbmodem3d11 -s dddddddddddddddeeeeeeeeeeeeeee
Running the script via Apache HTTP Server
At this point, someone could ssh in to the computer running the camera and control it via the command line, but I wanted to have a slightly more sophisticated interface. I decided to go with a simple jQuery-powered web page that hits a CGI script served up by apache. (Note: of course, if you want people to be able to control the camera from outside your local network, you’ll need a static IP address for your machine. In that case, you should probably also make sure you set up basic authentication for your apache server.)
If you’re running OSX, apache is already installed. You can start it up by running sudo apachectl start, the config is located at /etc/apache2, and the DocumentRoot points to /Library/WebServer/ by default.
cd /Library/Webserver/CGI-Executables
vim pan-tilt.cgi
pan-tilt.cgi is the following ruby script:
#!/opt/local/bin/ruby

query_string=`echo $QUERY_STRING`

if query_string.length != 0
`/opt/local/bin/arduino-serial -b 9600 -p /dev/tty.usbmodem3d11 -s #{query_string}`
result=`echo $?`
result=result.gsub(/n/,"")
end

print "Content-type: application/jsonnn"
print "{"result": "#{result}"}n"
Finally, create the web page:
cd /Library/Webserver/Documents
vim pan-tilt.html
pan-tilt.html:
<script src="http://ajax.googleapis.com/ajax/libs/jquery/1.5.1/jquery.min.js"></script>
<script>// <![CDATA[
// send the input to the cgi script
// note: sending 3x the input for every keypress, to make the movement smoother
var submitInput = function(input) {
$.post("/cgi-bin/pan-tilt.cgi?" + input + input + input);
};
// submit input when someone presses a key down
$(document).keydown(function(event) {
console.log(event.keyCode);
switch(event.keyCode) {
case 82:
submitInput('r');
break;
case 83:
submitInput('s');
break;
case 68:
submitInput('d');
break;
case 69:
submitInput('e');
break;
case 88:
submitInput('x');
break;
case 37:
submitInput('s');
break;
case 39:
submitInput('d');
break;
case 38:
submitInput('e');
break;
case 40:
submitInput('x');
break;
default:
}
});
// ]]></script>
<h1>Pan/Tilt Camera Control</h1>
<div>
<table>
<tbody>
<tr>
<td></td>
<td>&amp;uarr;</td>
<td></td>
</tr>
<tr>
<td>&amp;larr;</td>
<td>r</td>
<td>&amp;rarr;</td>
</tr>
<tr>
<td></td>
<td>&amp;darr;</td>
<td></td>
</tr>
</tbody>
</table>
<table>
<tbody>
<tr>
<td></td>
<td>e</td>
<td></td>
</tr>
<tr>
<td>s</td>
<td>r</td>
<td>d</td>
</tr>
<tr>
<td></td>
<td>x</td>
<td></td>
</tr>
</tbody>
</table>
</div>
<div style="clear: left;">
todo: add security</div>
Testing
At this point you should be able to go http://localhost/pan-tilt.html and control the camera from there. Check out the video below!
may i have this code but for windows 7?
Will this code work with Windows 7?
Hello! I could have sworn I’ve visited this blog before but after browsing through many of the posts I realized it’s new to me.
Anyways, I’m certainly happy I came across it and I’ll be bookmarking
it and checking back regularly!
Hello! Can this pan/tilt be made so it can be controlled thru IR ? Than you!!
Dan
Hello, thanks for this enlightening post, I was searching for that… Some comments if you have the time to look at them.. You don’t mention how you prevent the arduino from resetting on DTR when arduino-serial access the port. I use a 27uF between reset and ground, it works for me (arduino nano). Also I have to leave the serial monitor open to have a speedy response when I press the arrows keys on the web page. Lastly the web page does not display correctly, I only get text:
Pan/Tilt Camera Control
↑
← r →
↓
e
s r d
x
todo: add security
but hey, like you often say, it works :-) ! and I will be able to pan and tilt my webcam in Montreal when I’m away for the winter in Florida !
Thank’s again , jrb