Category Archives: Robotics

Mini Simon Game

Another fun little project to practice my soldering skills and become more familiar with the Arduino.

Parts list:

  • Arduino Uno (SparkFun)
  • 4 push buttons (SparkFun)
  • Red/Green/Blue/Yellow LEDs (SparkFun or RadioShack)
  • PC Board Piezo Buzzer (SparkFun or RadioShack)
  • 4x 330 ohm resistors
  • 4x 10k ohm resistors
  • wire
  • PC board (I really like these) or breadboard

Schematic

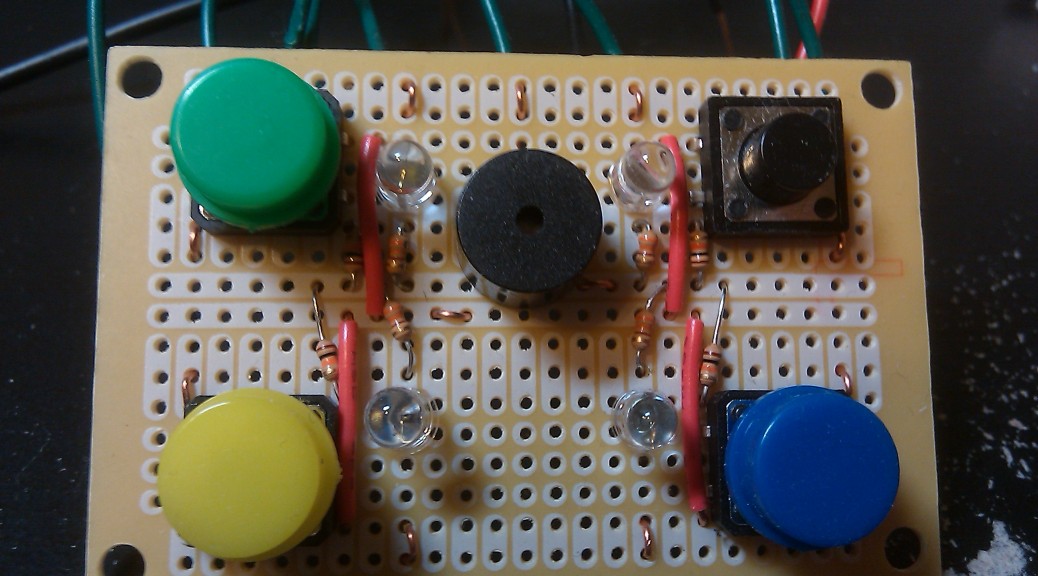
The buttons are wired to pins 5-8 with one node connected to +5V and the other to ground via a 10k ohm pull-down resistor. The LEDs to pins 10-13, with 330 ohm current limiting resistor. The piezo buzzer is connected directly to pin 9 and ground. For the wires going to the Arduino pins, I just wired one end to the board and left the other end hanging, so it is not permanently attached to the Arduino.

Code

For more information about working with the piezo buzzer and an Arduino, check out CIRC06 at ardx.org

// Whether we're in "listen" or "playback" mode
boolean listen;

// Change this value to increase or decrease the number of rounds
// played before winning the game
const int num_rounds = 9;

const int speakerPin = 9;
// "A" note frequency
const int a = 1136;
// how long to play a note
const int timestep = 500;

char buttons[] =   { 'y', 'b', 'r', 'g' };
int button_pins[] = { 5,   6,   7,   8 };
int led_pins[] =    { 10,  11,  12,  13 };
// The frequency of all other notes is based off the "A" note
// See: http://en.wikipedia.org/wiki/Simon_(game)#Gameplay
int notes[] = { a * 1.25 * 1.25,
a * 1.25,
a,
a * 0.75
};
// The note we play for failure
const int fail_note = a * 4;

// an array of the buttons for this game
int play_buttons[num_rounds];

// which round are we currently playing?
int currentRound;
// what button are we on for the current round
int current_button;

// Set up the LEDs and buzzer as output,
// and the buttons as input
void setup() {
pinMode(speakerPin, OUTPUT);
for (int i=0; i<4; i++) {
pinMode(button_pins[i], INPUT);
pinMode(led_pins[i], OUTPUT);
}

initialize();
}

void loop() {
if (listen) {
int buttonPress = readButtons();

// Check whether a button was pressed
if (buttonPress != -1) {

// make the button sound and light up the LED, to provide feedback
playButton(buttonPress, timestep/2);

// They hit the appropriate button
if (buttonPress == play_buttons[current_button]) {
delay(timestep);

// They just played the final button for the final round
if (current_button == num_rounds) {
win();
return;
}

// They just played the final button for this round
// Reset the round and switch to "playback" mode
if (current_button == currentRound) {
current_button = 0;
currentRound++;
listen = false;
return;
}

// They're still in the middle of this round
// Increment the current button and wait for next input
current_button++;
} else {  // they didn't hit the correct button!
fail();
return;
}
} // end listen
} else { // play all buttons for the round
if (currentRound == num_rounds) {
win();
return;
} else {
// playback all the buttons for this round
for (int i=0; i<=currentRound; i++) {
playButton(play_buttons[i]);
delay(timestep/2);
}
// switch to "listen" mode
listen = true;
}
}
}

// During initialization, randomly choose arrays of buttons
// for each round, then play a button pattern to let the user know
// that the game has been loaded
void initialize() {
delay(timestep*2);

randomSeed(analogRead(0));
for (int i=0; i<num_rounds; i++) {
play_buttons[i] = (int)random(0, 4);
}
listen = false;
currentRound = 0;
current_button = 0;

spin_colors();
spin_colors();

delay(timestep*2);
}

// Play the "failure" tone and restart the game
void fail() {
playTone(fail_note, timestep * 4);
delay(timestep*2);
initialize();
}

// Play the "win" button pattern and restart the game
void win() {
for (int i=0; i<4; i++) {
spin_colors();
}
delay(timestep*2);
initialize();
}

void spin_colors() {
for (int i=0; i<4; i++) {
playButton(i, timestep/4);
delay(timestep/4);
}
}

void playButton(int color) {
playButton(color, timestep);
}

// Turn on the LED and play the button's tone
void playButton(int color, int duration) {
digitalWrite(led_pins[color], HIGH);
playTone(notes[color], duration);
digitalWrite(led_pins[color], LOW);
}

// Play the buzzer at the tone's frequency
void playTone(int tone, int duration) {
for (long i = 0; i < duration * 1000L; i += tone * 2) {
digitalWrite(speakerPin, HIGH);
delayMicroseconds(tone);
digitalWrite(speakerPin, LOW);
delayMicroseconds(tone);
}
}

// Iterate over all the buttons and check if one was pressed
int readButtons() {
for (int i=0; i<4; i++) {
if (digitalRead(button_pins[i]) == HIGH) {
return i;
}
}
return -1;
}

Video

Electronic Dice

This weekend I worked on a fun little project: an “electronic die”. You press the button and it randomly cycles through possible die rolls, eventually “landing” on a number.

Video:

Schematic:

LED layout:

d11 d13
d21 d22 d23
d31 d33

Code:

int generatingNum = 0;

int buttonPin = 9;
int speakerPin = 2;

void setup() {
pinMode(buttonPin, INPUT);
pinMode(speakerPin, OUTPUT);

pinMode(13, OUTPUT); // 1
pinMode(12, OUTPUT); // 2
pinMode(11, OUTPUT); // 4a
pinMode(10, OUTPUT); // 6a
randomSeed(analogRead(0));

}

void loop() {
int buttonState = digitalRead(buttonPin);
if (buttonState == HIGH && generatingNum == 0) {
generateNum();
}
}

void generateNum() {
generatingNum = 1;
int currentNum = 0;
for (int i=5; i<=25; i++) { showNum(0); delay(100); int nextNum = (int)random(1, 7); while (nextNum == currentNum) { nextNum = (int)random(1, 7); } currentNum = nextNum; showNum(currentNum); double delayTime = (.5*i + i*i*i)/20; digitalWrite(speakerPin, HIGH); delay(delayTime); } generatingNum = 0; } void showNum(int num) { digitalWrite(13, LOW); digitalWrite(12, LOW); digitalWrite(11, LOW); digitalWrite(10, LOW); switch (num) { case 1: digitalWrite(13, HIGH); break; case 2: digitalWrite(12, HIGH); break; case 3: digitalWrite(13, HIGH); digitalWrite(12, HIGH); break; case 4: digitalWrite(12, HIGH); digitalWrite(11, HIGH); break; case 5: digitalWrite(13, HIGH); digitalWrite(12, HIGH); digitalWrite(11, HIGH); break; case 6: digitalWrite(12, HIGH); digitalWrite(11, HIGH); digitalWrite(10, HIGH); break; default: digitalWrite(speakerPin, LOW); break; } } [/sourcecode]

$50 Robot

I couple of weeks ago I built a robot using the $50 Robot tutorial at Society of Robots. I want to thank the authors of the tutorial and the members at the forums for creating such a great resource for noobs like me. Building this robot was great fun, and I feel much more confident now about tackling simliar projects in the future.

The robot’s programming is very simple: it goes right when the right sensor receives more light, it goes left when the left sensor receives more light, and goes straight when the sensor input is equal.

Here’s a close-up of one of the sensors:

The wheels are powered by servos, which run off a set of 4 AA batteries. The board is powered by a 9V battery which is run through a 5V linear regulator to provide a steady 5V to the AT-Mega8 microcontroller. The tutorial suggests buying a battery holder with an on/off switch, which I did, but since I was using two separate power sources I decided to wire in my own on/off switch for the whole circuit.

For the “chassis” I used an old, somewhat flexible plastic cutting board. It was convenient because I could cut it and poke holes into it easily. Since the plastic was so flimsy, I glued chopsticks on the bottom of the robot for support. I highly recommend buying a big pack of wooden chopsticks from the grocery store–it’s like the poor man’s balsa wood.

Here’s a video of the robot in action. As you can see, the wheels don’t always provide the best traction, but hey, it works!

Installing player/stage on OS X 10.5 Leopard

This tutorial will go through the steps for installing player/stage on OS X. We’ll work through any issues encountered along the way, and verify the stage installation. The tutorial won’t go into verifying the player installation against any hardware.

UPDATE (6/20/10): These instructions don’t work for the latest MacPorts install of player (3.0.0) + OSX 10.6 (Snow Leopard). For example, if you try to run player you get the following:

$ player
Registering driver
Player v.3.0.0
USAGE:  player [options] []

Where [options] can be:
  -h             : print this message.
  -d      : debug message level (0 = none, 1 = default, 9 = all).
  -p
      : port where Player will listen. Default: 6665
  -q             : quiet mode: minimizes the console output on startup.
  -l    : log player output to the specified file
     : load the the indicated config file

The following 81 drivers were compiled into Player:

    Segmentation fault

Or if you try to run player with the stage plugin you get this:

$ player cfg/voronoi.cfg
Registering driver
Player v.3.0.0

* Part of the Player/Stage/Gazebo Project [http://playerstage.sourceforge.net].
* Copyright (C) 2000 - 2009 Brian Gerkey, Richard Vaughan, Andrew Howard,
* Nate Koenig, and contributors. Released under the GNU General Public License.
* Player comes with ABSOLUTELY NO WARRANTY.  This is free software, and you
* are welcome to redistribute it under certain conditions; see COPYING
* for details.

loading plugin stageplugin
error   : Failed to load plugin stageplugin.
error   : libtool reports error: file not found
error   : plugin search path: /Users/jaustin/work/player-bots/voronoibot:cfg:/opt/local/lib/
error   : failed to load plugin: stageplugin
error   : failed to parse config file cfg/voronoi.cfg driver blocks

There are a couple of related issues posted for the playerstage-player MacPorts port (22642, 23179, 26048, 26329), and my suspicion is that it has to do with compiling with x86_64 architecture in OS X 10.6. It seems like one can try to build the macports using different options to get around the architecture issue, or try building player from source. I’ll post an update if I figure it out.

Step one: Install MacPorts (aka DarwinPorts)

This installation requires
After you’ve installed from the disk image, update ports to the latest version
$ sudo port selfupdate

Step two: Install player/stage

If you don’t have cmake, get it now, else the install will fail:
$ cmake
-bash: cmake: command not found
$ sudo port install cmake
Then install stage (playerstage-stage has a dependency on playerstage-player, so player will be installed as well):
$ sudo port install playerstage-stage
Note: On Snow Leopard, this install took forever for me. I did have some internet issues in the middle of the install, but it still took most of the day to build. So I would recommend being patient here.
By default, the installer will use /opt/local as the install prefix, giving you the following setup:
/opt/local/bin (executables, including the 'stage' program)
/opt/local/lib (libraries, including libstage)
/opt/local/share/player (contains data resources, such as images)
/opt/local/share/stage (contains data resources, such as images)
Since /opt/local/bin should already be on your path, you shouldn’t have to do any extra setup to access the executable.

Step three: Verify installation (OS X 10.5)

At this point, you want to try running stage against an example world. However it seems that the DarwinPorts installation doesn’t install any worlds under /opt/local/share/stage. So you can go to the player/stage SourceForge site and download the latest stage source archive.
Extract the archive and copy the worlds directory to /opt/local/share/stage.
Now, cd into the stage directory and run the test:
$ cd /opt/local/share/stage
$ stage worlds/simple.world
dyld: Library not loaded: libstage.3.2.2.dylib
Referenced from: /opt/local/bin/stage
Reason: image not found
Trace/BPT trap
Looks like the stage libraries are not on our path, so let’s add them (note that you should also add this to your ~/.profile):
$ export DYLD_LIBRARY_PATH=/opt/local/lib
And try again:
$ stage worlds/simple.world
stage simple.world dyld: Symbol not found: __cg_jpeg_resync_to_restart
Referenced from: /System/Library/Frameworks/ApplicationServices.framework/Versions/A/Frameworks/ImageIO.framework/Versions/A/ImageIO
Expected in: /opt/local/lib/libjpeg.7.dylib
Trace/BPT trap
We still have issues. It looks like the version of libjpeg.dylib on our library path is a different version from what ImageIO is expecting. Maybe there was a transitive dependency in the DarwinPorts install that’s screwed us over, who knows. Anyway, if we point to OS X’s version of libjpeg, maybe we’ll eliminate this issue.
$ cd /opt/local/lib
$ sudo rm libjpeg.dylib
$ sudo ln -s /System/Library/Frameworks/ApplicationServices.framework/Versions/A/Frameworks/ImageIO.framework/Resources/libJPEG.dylib libjpeg.dylib
$
$ cd /opt/local/share/stage
$ stage worlds/simple.world
dyld: Symbol not found: __cg_TIFFClientOpen
Referenced from: /System/Library/Frameworks/ApplicationServices.framework/Versions/A/Frameworks/ImageIO.framework/Versions/A/ImageIO
Expected in: /opt/local/lib/libTIFF.dylib
Looks like a similar issue, so we’ll try the same trick again (and yet again for libpng):
$ sudo rm libtiff.dylib
$ sudo ln -s /System/Library/Frameworks/ApplicationServices.framework/Versions/A/Frameworks/ImageIO.framework/Resources/libTIFF.dylib libtiff.dylib
$ sudo rm libpng.dylib
$ sudo ln -s /System/Library/Frameworks/ApplicationServices.framework/Versions/A/Frameworks/ImageIO.framework/Resources/libPng.dylib libpng.dylib
$
$ cd /opt/local/share/stage

$ stage worlds/simple.world
Stage 3.2.2
[Loading worlds/simple.world][Include pioneer.inc][Include map.inc][Include sick.inc]
Success!
Try holding the ctrl key and moving your mouse cursor around to change the view. You can also press “p” to unpause the simulation.
Now let’s test to see that plugins are working:
$ stage worlds/fasr.world
Stage 3.2.2
[Loading worlds/fasr.world][Include pioneer.inc][Include map.inc][Include sick.inc]warn:
multi-thread support is experimental and may not work properly, if at all. (/opt/local/var/macports/build/_opt_local_var_macports_sources_rsync.macports.org_release_ports_science_playerstage-stage/work/Stage-3.2.2-Source/libstage/world.cc Load) [threads 2]
A window should pop up. Press “p” and watch the robots move around.
This verifies that the stage plugins are working.

Verify Installation (OS X 10.6)

With 10.6, I had a much easier time installing for some reason (perhaps because I used MacPorts instead of DarwinPorts?). The only issue I found was that the STAGEPATH variable was not set, so I set that and was good to go.
$ stage worlds/simple.world
Stage 3.2.2
 [Loading worlds/simple.world][Include pioneer.inc][Include map.inc][Include sick.inc]Libtool error: file not found. Can't open your plugin controller. Quitting
err: Failed to open "wander". Check that it can be found by searching the directories in your STAGEPATH environment variable, or the current directory if STAGEPATH is not set.]
 (/opt/local/var/macports/build/_opt_local_var_macports_sources_rsync.macports.org_release_ports_science_playerstage-stage/work/Stage-3.2.2-Source/libstage/model_load.cc LoadControllerModule)
libtool error #2
$ export STAGEPATH=/opt/local/lib
$ stage worlds/simple.world
Stage 3.2.2
 [Loading worlds/simple.world][Include pioneer.inc][Include map.inc][Include sick.inc]

Unfortunately, while the stage plugin seems to work, the player port is broken on OS X 10.6 (see the top of this post).